LED Best Practice

Introduction

Make sure you read through all our tips and best practice guidelines.

If you require assistance understanding these tips, want an expert opinion on your content or need help creating content, MKTG Studio is here to help.

LED content guidelines

Legibility

Maximise scale

Content should fill up as much of the LED height as possible.

There are no safe areas on the LED, all pixels will be seen.

Big and bold is best

Text and graphics should be large and bold to maximise legibility from a distance.

Shorter messages perform better than longer creatives with a lot of copy.

High contrast

Maximise contrast between the background and foreground elements.

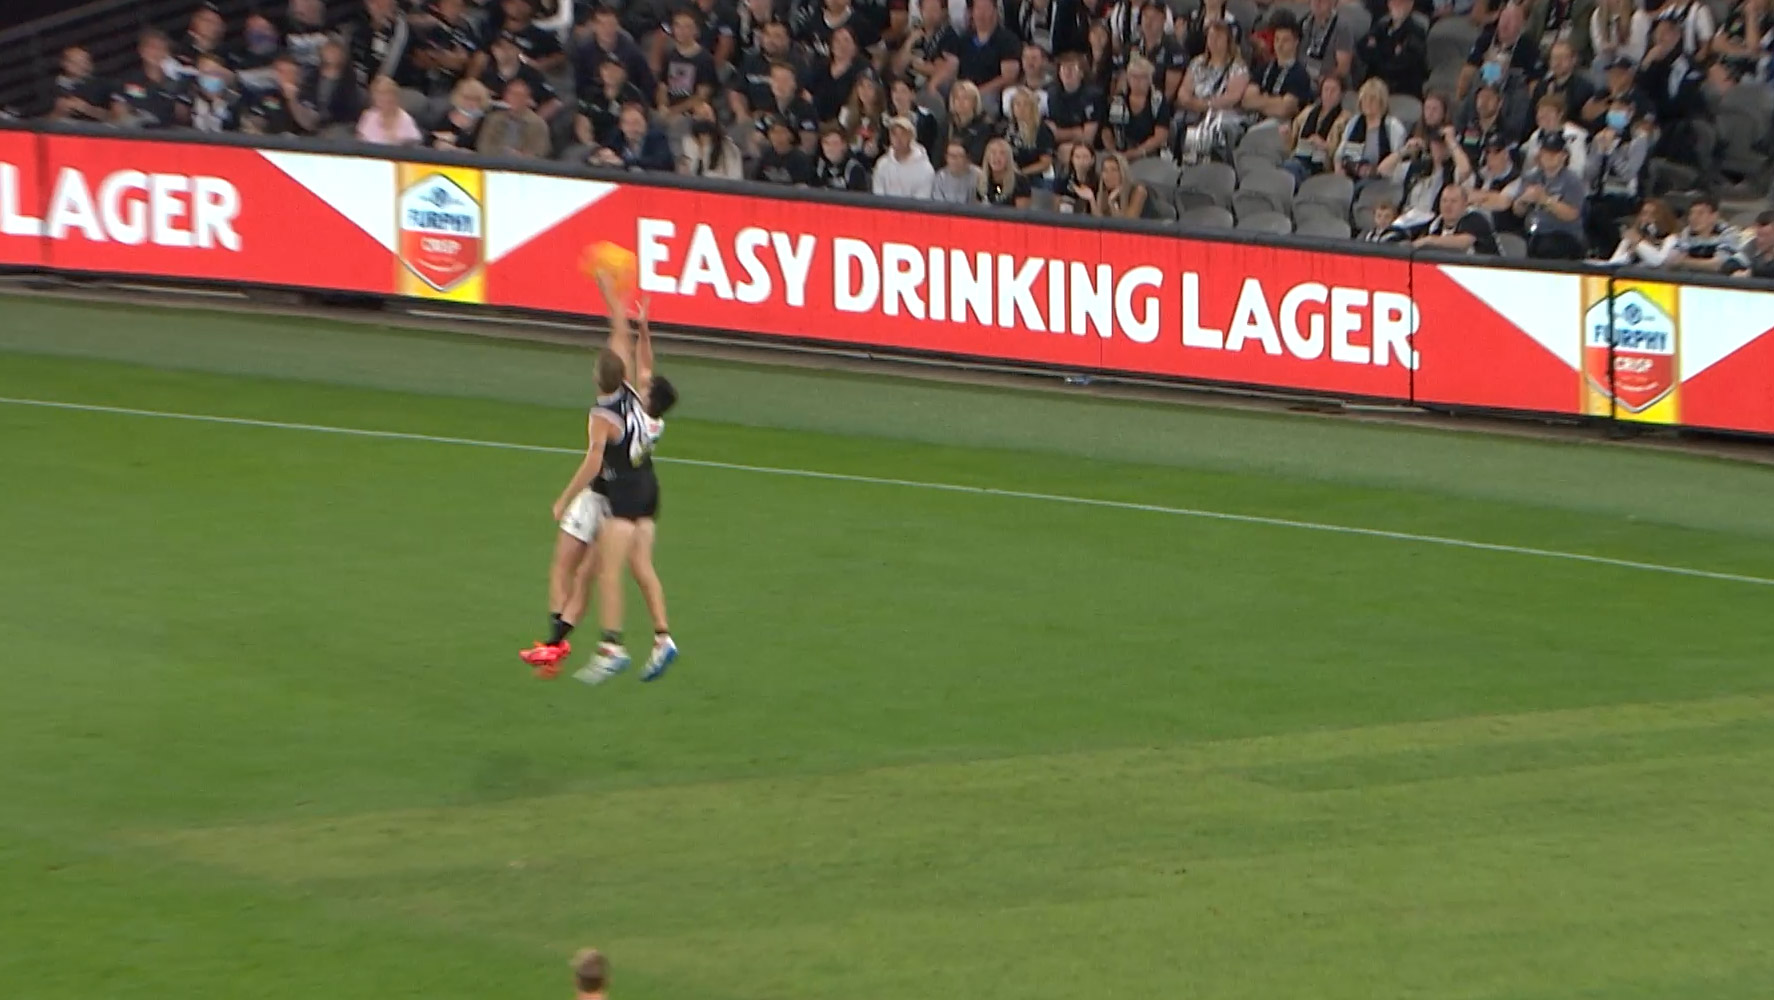
Dark or colourful backgrounds

Dark or bold colour backgrounds perform best on broadcast.

White and lighter colours should be avoided as the white can overpower the content.

Animation tips

Animated content can be a great way to draw the eye and display multiple messages over the duration of the content.

However animations must not be too distracting, scroll too fast, feature too many messages or flashing graphics.

Consider having your branding/main message on screen for the majority of the duration.

You can use photos, product images and video on the LED, however using these elements exclusively isn’t very effective in this space.

Layout

Ensure even spacing

Making sure your elements are evenly spaced ensures that you don’t leave large empty spaces on the LED.

Take into consideration your content will be back to back with another file.

Use the whole space

Make sure to populate the entire LED and not leave large gaps.

You may miss out on exposure if too much space is left blank.

Do not put two lines of text on top of each other on the LED.

No content on edges

Do not use your elements to cover up the seams between files. Content will end up cut in half.

This does not apply for scrolling / moving content.

Have consistent sizes

You should keep all logos and assets the same size throughout your LED and across all files.

Field and parapet can have different sizes to each other.

Order of content

Consider your designs not only on their own but in relation to each other.

If you have a tile that starts and ends with a logo such as below:

When it is tiled, you will end up with two logos next to each other before the text repeats.

There is nothing wrong with this, but it is something to keep in mind.

Including lower logos

Some designs include a set of small logos along the bottom of the field LED.

This option can be useful if there is a close up near the LED.

Tiled LED

Overview

When using the tile spec, it is important that you design content that doesn’t create visible seams between the tiles.

To check the seams between your tiles, put the tiles you have created together end to end, to test if they blend seamlessly throughout the animation.

Animation

Animated elements that move off the side of the tile need to ‘re-appear’ on the opposite side of all tiles.

Backgrounds

Coloured/Textured backgrounds should blend from end to end.

Tile spec vs 360° spec

When tiled and 360 specs are available, you will need to choose which spec type to create, as both have their own advantages.

The tile spec offers the ability to make the content in less files and with more manageable dimensions. However to account for the different sizes of parapet displays, the tile is relatively narrow and doesn’t allow for longer messages.

The 360 spec allows for more flexibility when creating content and the ability to use the whole stadium as a unique canvas. However as there are more files involved that are larger and often connect from one to the next, it can be more involved to set up.

Combination tile and 360°

When tiled and 360 specs are available, it is recommended you make your content entirely with the tile OR 360 spec.

However it is possible to deliver a combination of these two specs.

In Drop search the Asset Specification drop down for ‘Combo’.

Combo 1 is for tiled field and 360 parapet.

Combo 2 is for 360 field and tiled parapet.

File creation

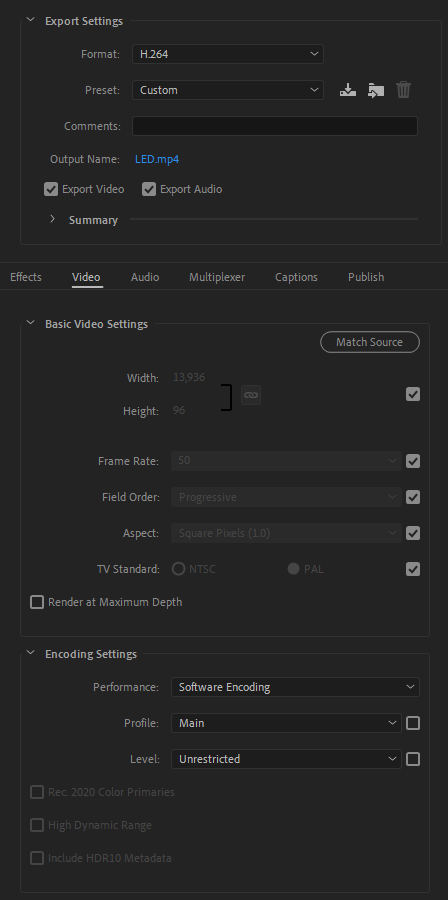
How to ensure accurate duration

Due to the way the LED are played out, it is important that all files are the same duration.

Where a spec requires a certain duration, the files must all be exactly that duration, and not a frame more or less.

For example if you are required to make content that is 15 seconds long, you can check the duration in After Effects in the composition settings. The duration should read ‘0.00.15.00’

How to render large files

Sometimes when creating files in Adobe Media Encoder or Handbreak, the large dimensions of the LED files can be restricted by the default settings. Make sure to double check the output dimensions.

You may need to change the following Media Encoder settings to the following:

Profile: Main

Level: Unrestricted

LED Examples

Contact

Head of Content

Elizabeth Cook

MKTG STUDIO / Specs

Isaac Moores

CLUB CONTENT

Laura Gualtieri

Create content with

We create content for a myriad of clients for a wide range of assets. From the big screen, to the field LEDs and to the TV’s around the stadium, our in-house studio team is a time efficient and cost effective solution.

MKTG Studio can help not only create content, but provide expert advice on best practice.

Head of Content

Elizabeth Cook

MKTG STUDIO / Specs

Isaac Moores

Join MKTG SPECS mailing list

And you always have the latest information.